Friday, January 30, 2009

Home Creamery

It's been bitterly cold for more than a week now. How cold? Well, let's just say it got warm enough to snow the other day. It's the kind of weather that makes you want to stay indoors, curled up in a sunny room with a good book. It just so happens I've been curled up a lot lately with The Home Creamery, by Kathy Farrell-Kingsley, founder of the Great Cakes Bakery in Westport Connecticut. On my day off, I decided to save the field trip to Westport for a warmer day and stay in for a day of pajama cooking instead.

This is when I spend the whole day in my pajamas (Oh come on, we've all done it right?) doing some slow cooking - the kind that takes all day, but is largely unattended. So that leaves plenty of time for reading, brushing up on my rendition of Highway to Hell for Rockband, or watching the Presidential inauguration - all without getting out of my pajamas

Since I had been dying to try out some of the recipes from The Home Creamery, I thought it would be the perfect way to spend the day. I settled on making Homemade Ricotta cheese and Homemade Butter, since neither of these require any special ingredients such as rennet or citric acid. The book provides two methods for each, so I thought I'd try both.

Well, the day got off to a rocky start. The first recipe I made was ricotta cheese using cultured buttermilk as the curdling agent. I didn't have enough milk to make a full recipe, so I figured I would just make half of the first recipe. It was simple, really: 1 quart of buttermilk to 1 gallon of milk, divided in half. But here's where it gets a little tricky: I was less than halfway through my first cup of coffee of the morning, and still sleepwalking a bit. I thought: 1 pint buttermilk to 2 quarts milk, then filled my quart measuring cup with milk and dumped it in the pot, followed by one pint of buttermilk. Catch that? I completely forgot the second quart of milk. Not realizing my mistake until much later (in one of those a-ha moments just before falling asleep) I followed through with the whole process. This entailed heating the mixture to 180 degrees F, letting the curds form for about 30 minutes, then draining it for 1-2 hours, and seasoning it. What I ended up with was actually a nice crumbly cheese with a texture not unlike crumbled feta, but with a flavor more like queso fresco, with a hint of sourness from the extra buttermilk.

The second batch of ricotta, however, went off without a hitch and turned out beautifully. This recipe used vinegar as the curdling agent. I heated the milk, removed it from the heat, then added the correct amount of vinegar and salt. According to the book this mixture should sit for 2 hours to develop it's curd, but I found it started to curdle almost immediately after adding the vinegar. Nevertheless, I followed Farrell-Kingsley's directions and let the pot sit covered at room temperature for 2 hours while I played a little Rock Band and watched some inaugural events. After the two hours were up, I transferred the whole thing to a cheesecloth lined colander and waited another 2 hours for it to drain (Highway to Hell, on medium baby!!).

Homemade ricotta
Next I moved onto making butter. The simplest method is just to put cream in a container and shake the hell out of it. So I kept a cup of cream in a pint deli container next to me all day, and gave it a shake every now and then. The more practical of the two methods in the book used a food processor. Churning the cream in the the food processor took only 6 minutes, and voila! Yellow butter solids and buttermilk. Kneading out the remaining liquid took about 10 or 15 minutes. I also kneaded in a little sea salt for flavor. The whole process took less than a half hour. And the cream in the deli container? After a total of 20 minutes of active shaking, it eventually formed yellow granules of butter solids and separated from its liquid. In addition, the cream also had time to ripen and the resulting butter was a little more flavorful and complex than the food processor version.

Homemade Butter
So at the end of the day I had:
1 pint buttermilk ricotta and 1 pint buttermilk whey
1 quart vinegar ricotta and 3 quarts!! whey
1 cup food processor churned butter and 1 cup buttermilk
1/2 cup hand shaken butter and 1/2 cup buttermilk
Thank goodness Farrell-Kingsley's book also contains recipes for using all that goodness. I actually got a chance to use the buttermilk to make some delicious Buttermilk Banana Muffins.
Related Pages:

Homemade Ricotta Homemade Butter Buttermilk Banana Muffins

Thursday, January 29, 2009

Recipe: Homemade Butter

Right after college, I waited tables briefly at a little French bistro in Providence, RI. Each day the pastry cook would whip cream and store it in a plastic tub for use during service. Sometimes it would be inadvertently left overnight or for a couple of days and start to taste like butter. The cream was no longer light and fluffy and you could see the liquid beginning to separate.

Making homemade butter is that easy - you don't even need a recipe, just a method of over-whipping heavy cream until the fat and milk solids form granules and release enough buttermilk. It can be as simple as shaking it in a jar, or whipping it in a food processor or stand mixer. There are a couple steps that follow, but if you use a mixer or food processor, the whole process takes less than a half hour and the results are worth it. You don't get fresher than homemade butter, and you'll taste the difference. Because it's fresh, your butter won't keep as long as commercial butter, so make it in small batches and keep it in the fridge for a few weeks or freeze it for up to 9 months.

Also, as a by product of making your own butter, you will have real buttermilk, which you can save for using in baked goods. This is not the same as cultured buttermilk which is sold commercially. That stuff is actually made from milk to which a culture is added to thicken it, and does not have the same flavor as true buttermilk.
This method, using a food processor, is adapted from Kathy Farrell-Kingsley's The Home Creamery. I use a Kitchen Aid 14-cup food processor. Results and processing times might vary with different machines:

Ingredients & Equipment: 
1 pint of heavy cream (yield: approximately 1 cup (1/2 lb.) of butter)
salt (optional)
food processor
a wooden spoon or potato masher
large bowl and/or colander

Basic Procedure:
1. Pour the heavy cream into the bowl of a food processor fitted with the metal blade and let 'er rip. After about 2 minutes, the cream will start to look like Cool Whip. This is the soft peak stage.

Soft peak cream
2. After another 2 minutes, the cream will already be over-whipped and start to look a little grainy.

Cream is slightly overwhipped
3. After another two minutes, butter solids have formed and released a lot of buttermilk. You will end up with about equal parts solids and buttermilk. Total time only 6 minutes!

Butter solids and buttermilk
4. Drain off the buttermilk and save it for baking. At this stage, The Home Creamery recommends transferring the mass into a colander and kneading out any remaining liquid with a wooden spoon or potato masher, but I found when I did that lots of butter was being lost through the holes too. So I would recommend using a bowl instead and just pouring off the liquid as it's released by kneading.

kneading the remaining liquid and blending the granules
4. The book doesn't mention it for this method, but after the butter has become uniform and released most of it's buttermilk, you may want to wash it. Simply rinse it under cold water, kneading gently and taking care not to handle it too much as it will melt. This will extend the life of the butter. One antique cookbook even recommends washing as a way of restoring rancid butter.

Uniformly kneaded butter
4. Now your butter is ready. If you like, knead in some salt. This will also extend its shelf life. I like to use fine sea salt. If you are serving it as a condiment, you could try a salt with larger crystals such as Maldon, or Fleur de Sel instead to add a little texture. Pack it into a crock, or wrap it in wax paper or parchment. It will keep in the fridge for several weeks, and in the freezer for up to 9 months.

finished butter packed into a ramekin for serving
Other methods and ideas:
Just for fun, I tried just taking a cup of cream and shaking it in a pint container too - a second method given in the book. Of course it took longer, but the granules eventually formed. In this case I rinsed the granules by shaking water in the jar and changing it a couple of times before kneading it and forming it. This is a great activity to keep restless kids occupied for a while because the granules will take about a half hour instead of 6 minutes to form.

My friend Megan at Brooklyn Farmhouse uses a stand mixer, which will not only whip the cream, but knead it for you too. She also uses local grass fed cream, which if you can get it will of course produce a superior butter.

Farrell-Kingsley also recommends using ripened cream to add complexity to your butter. To ripen cream, just set it out at room temperature for 12-24 hours. She notes that it should be "shiny and taste acidic" but not sour. The result will taste similar to European butter which is often described as more "cheesy" tasting.
Try using the buttermilk for baking. I used it to make delicious Buttermilk Banana Muffins.

Recipe: Homemade Ricotta

At work we get our ricotta cheese from a family-owned producer in Connecticut. It arrives carefully packaged in perforated metal containers specially made to allow excess liquid to drain away from the cheese. The product is fresh, delicious, and creamy, which was made even more apparent the day that our cheese supplier didn't arrive on time. We tracked down something else, in a plastic tub, that was so awful we couldn't serve it. It was grainy and had a distinct aftertaste that I imagined motor oil would taste like. It occurred to me later, that in a pinch, we probably could have made ricotta that was far superior to whatever it was in that plastic tub.

Traditional ricotta cheese is usually made from the whey drained from making sheeps milk cheeses like pecorino, making it a secondary cheese. The word "ricotta" actually means "re-cooked" in Italian. By strict definition, it isn't cheese at all, but curds. Anyway, all you need to make fresh ricotta cheese at home is milk and an acid coagulant to produce the curds. It's very easy and can take as little as a an hour, or as much as four hours, depending on what kind of acid you use and how dry you want your cheese. Whether you use citric acid, vinegar, lemon juice, or cultured milk (buttermilk) to curdle the milk, the process is pretty much the same: heat the milk, add the curdling agent either before or after heating, let the mixture sit to curdle, then drain. The ingredients you choose will of course affect the flavor of your cheese - most of all the milk. As with anything else, using fresh, high quality milk will produce fresh high quality cheese.

The method illustrated in the photographs is adapted from The Home Creamery, by Kathy Farrell-Kingsley. It uses vinegar, which takes longer to form curds, when compared to citric acid or buttermilk. Total time is approximately 3 to 4 hours:

Ingredients:
1 gallon of whole milk
1/3 cup white distilled vinegar
1 tsp. salt, dissolved in the vinegar

Equipment:
Stainless steel saucepan
Strainer or colander
Cheesecloth
Ladle or large spoon
Candy thermometer or instant read thermometer

Procedure:
1. Pour the milk in the saucepan and bring it to 180-190 degrees F, stirring as needed to prevent the milk from scorching. Once it reaches temperature, remove it from the heat, add the vinegar and salt and stir gently, just enough to incorporate. Curds should start to form almost immediately and will signal you to stop stirring. Incidentally, it is important that you use a non-reactive pan that is immaculate because any "seasoning" you have on the pan may be stripped away into your cheese.

Curds beginning to form
2. Cover the pot and set aside for up to 2 hours for the curds to form.

Fully formed curds after 2 hours
3. After about 2 hours the curds should form a pretty solid mass of curds floating in the whey. Gently scoop the curds and whey into a strainer or colander lined with damp cheesecloth. Let the mixture drain for as little as 15 minutes or up to 2 hours, depending on how dry you want your cheese.

Curds, draining
4. After the cheese has drained and is the consistency you want, you may choose add some cream to make it richer, and/or salt, to taste. If you won't be using it right away or store your cheese an airtight container for up to a week. You can also save the whey and use it in yeast breads instead of water. Farrell-Kingsley says the yield on this recipe is approximately 1-1/2 cups, but when I made it I got almost a quart.

Finished ricotta
Other Methods and Ideas:
For even richer and creamier ricotta, try using 1 part heavy cream to 3 parts milk.  I found that partially substituting cream also resulted in a significantly higher yield.

Citric acid is available through cheese-making supply houses. For 1 gallon of milk, you can substitute 1 teaspoon of citric acid for the vinegar. Add the citric acid and salt to the milk before heating, and heat the whole mixture, stirring only as needed to keep it from scorching. Remove from the heat and let the mixture sit undisturbed for about 10 minutes. Drain to your desired consistency.

Cultured buttermilk can also be used to form the curds. To one gallon of milk, add 1 quart of buttermilk. As when using citric acid, heat the whole mixture. Then remove from the heat and let it sit undisturbed for 30 minutes. Drain to your desired consistency.

You can also use lemon juice instead. A good recipe can be found at Brooklyn Farmhouse.

Try using your homemade ricotta to make a Vegetable Torte.

Tuesday, January 27, 2009

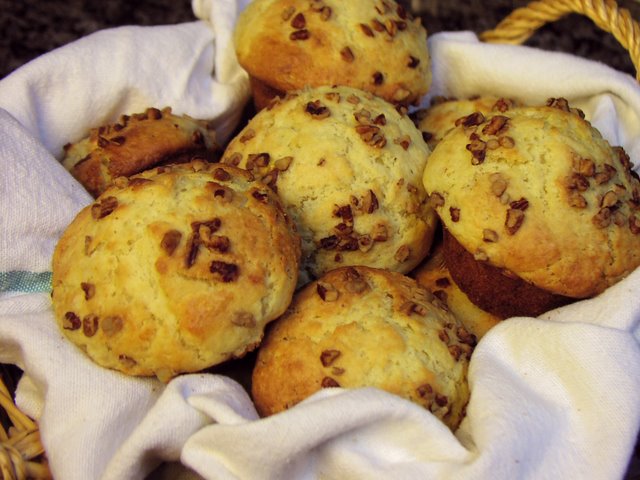
Recipe: Buttermilk Banana Muffins

Real buttermilk, a great by-product of making Homemade Butter makes all the difference in this recipe. When I first started making muffins, I had to go to several cookbooks to find a good base recipe for muffins, and finally found one in the America's Test Kitchen Family Cookbook. After making butter this week, I had just enough buttermilk to substitute for the yogurt I usually use, and just enough bananas in my freezer to make a batch of muffins. What a difference it made. The buttermilk gave the muffins a really nice even crumb, and they were even lighter than usual. My boyfriend actually begged me to take some to work so he wouldn't be tempted to eat them all.

If you don't have real buttermilk, you can substitute cultured buttermilk, yogurt or milk. If you use milk, stir in 1 Tbsp. of lemon juice and let it sit for 10 minutes until it starts to thicken. For best results use whole products, not lowfat or non-fat.

Ingredients, yields 12 large muffins:
3 c. all purpose flour
1 c. sugar
1 Tbsp. baking powder
1/2 tsp. plus a pinch of baking soda
1/2 tsp. salt
1/2 tsp. grated nutmeg
1-1/2 c. buttermilk
2 large eggs
8 Tbsp. butter, melted and cooled
1 c. mashed bananas
1/4c. chopped pecans (optional)
cooking spray or additional butter for the pan

Procedure:
  1. Preheat oven to 375 degrees F. Prepare a large muffin pan by spraying with cooking spray or greasing with butter.
  2. In a large bowl, combine the flour, sugar, baking powder, baking soda, salt, and nutmeg. Whisk until well combined.
  3. In a separate bowl or large measuring cup, whisk together the buttermilk and eggs.
  4. Form a well in the center of the flour mixture, pour in the buttermilk mixture and fold until most of the dry ingredients are absorbed. Do not overmix.
  5. Gently fold in the melted butter, then the bananas.
  6. Using a large ice cream scoop, divide the batter evenly in the muffin pan. I like to press a few chopped pecans into the top of each muffin to add a little toasty crunch. Bake 25-30 minutes until golden brown. Cool 5 minutes, then remove the muffins from the pan and cool on a wire rack.
Related Pages:


Homemade Butter Pajama Cooking

AMAZON