Thursday, March 12, 2009

Getting Ready for St. Patrick's Day: Home Cured Corned Beef

Okay friends, if you're going to cure your own brisket for St. Patrick's day Corned Beef and Cabbage, you need to start TODAY. That baby needs at least 5 days of salt-curing before even going into the pot.  I may not be of Irish descent, but one of the great things about growing up in New York is that no matter where your parents are from, having Corned Beef on St. Patrick's day (or any day of the year for that matter) can be just as close to your heart as Roast Pork on Chinese New Year.  I'm drooling already, just thinking of Reuben sandwiches and fresh corned beef hash I'm going to make from the leftovers. Even though it's one of my favorite foods, this is the first time I've ever made Corned Beef (yeah, you boil it for a really long time, not rocket science) let alone cured my own brisket.  So I started curing a brisket earlier this week for a test run.


Corned beef is basically a brisket that has been preserved in salt (and spices).  Incidentally, pastrami is simply corned beef that has been smoked.  As with most foods that originated out of necessity (before refrigeration and refrigerated transport of course) we still continue this tradition for love of the the unique flavor and texture that salt-curing imparts.  The tradition of having corned beef and cabbage on St. Patrick's Day is apparently of American origin.  According to the history channel, Irish Americans in the late 1800's substituted corned beef for the bacon that would have been traditional to their homeland.

For my maiden voyage into making Corned Beef and Cabbage, I went to my most reliable source - America's Test Kitchen Family Cookbook.  I used their recipes for both the cure and the cook and true to their word, it was practically foolproof and had really great flavor.  Oh, by the way I didn't have plain paprika on hand, so I used smoked paprika, which added just a hint of smokiness.  One of the things about home-curing your brisket, of course, is being able to control the seasoning - a longer cure will result in a more flavorful brisket but too long a cure and it will be overly salty.  I went with a 5 day cure myself  and after taking the cured brisket out of the ziplock bag, you could even feel the difference.   I was fortunate enough to find a thicker well-marbled point cut brisket (as opposed to the thinner and leaner flat cut that is more widely available).  After curing, the once supple bright red piece of organic Whole-Foods, locally raised brisket had released most of it's moisture and was firmer, almost leathery.  This was a good sign of course.

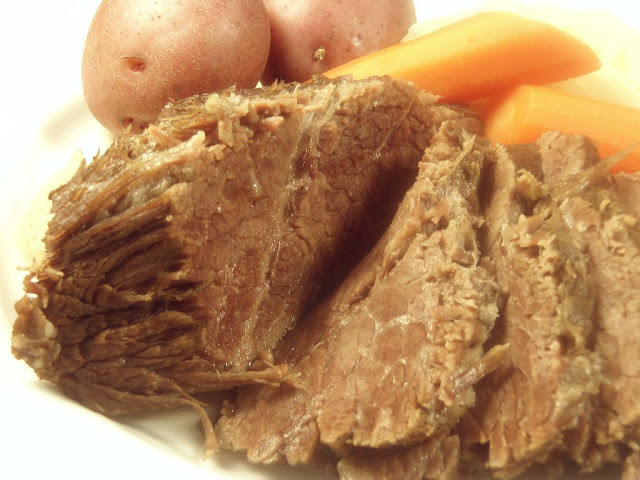
As directed I simmered that sucker for 3 hours after which the recipe says a fork should slide easily into the center of the meat.  Hmm.  not quite.  It probably could have gone longer, since it would take much longer to overcook the brisket to the point that it would fall apart, but I thought a little resistance was better for slicing - and it was fine.  It sliced really nicely across the grain and the flavor was spot on.

By the way, the recipe calls for a 3-1/2 to 4-1/2 lb. brisket, but between curing and cooking, there is a lot of shrinkage, so it's actually not as much meat as it sounds like.  Oh, and don't worry if your home-cured corned beef is not as pink as store bought - you won't miss those nasty nitrates and nitrites that are sometimes commercially added to preserve color.

SOURCE: Adapted from the America's Test Kitchen Family Cookbook
YIELD: Approximately 8 servings

INGREDIENTS:
for the cure:
1/2 c. kosher salt
1 Tbsp. cracked black peppercorns
1 Tbsp. dried thyme
2 tsp. allspice
2 tsp. paprika (or try smoked paprika)
2 bay leaves, crumbled
1 3-1/2 to 4-1/2 lb. beef brisket, trimmed
for cooking:
3 bay leaves
1 Tbsp. whole black peppercorns
1 Tbsp. whole mustard seeds
. Water
1-1/2 lbs. baby red or baby yukon gold potatoes
1-1/2 lbs. carrots, peeled and cut into thirds
1 2 lb. head of cabbage, cut into 8 wedges
Spicy deli-style mustard, for serving (I prefer Koscuisko brand for it's sharp horseradish-y flavor)

PROCEDURE:
1. Cure the brisket. Mix all the salt and spices together in a small bowl. Spear the brisket 30 times on each side with a meat fork or metal skewer. Rub each side evenly with the salt mixture then place it in a ziplock bag, forcing out as much air as possible. Put the brisket on a rimmed baking sheet and cover with a second one. Tape or tie the whole thing together and weigh it down with two bricks or large cans. Refrigerate, weighted, for 5 to 7 days. Rinse and pat the meat dry before cooking.

 2. To cook the brisket, add the corned beef, bay leaves, peppercorns, and mustard seeds in a large dutch oven or pot and cover by a 1/2 inch of water. Simmer for 2-3 hours until a fork slides easily into the center of the meat.

3. Transfer the meat and 1 cup of liquid to a baking dish and keep warm in a 200 degree oven while you cook the vegetables. Add the potatoes and carrots to the cooking liquid left in the pot and simmer until they begin to soften (10 minute). Then add the cabbage and simmer 10-15 minutes more or until all the vegetables are cooked.

4. To serve, remove the meat from the liquid and slice against the grain. Arrange the meat on a platter with the cooked vegetables and moisten with additional cooking liquid. Serve with spicy mustard on the side.

Note: Spearing and weighting down the brisket are essential steps for proper curing. I tried this once forgetting these steps and the cure didn't take so the brisket became rancid. Not pretty nor edible.

Thursday, March 5, 2009

Braised Pork Belly Tacos

I’ve been getting quite the education on Mexican food and culture at work, since many of the kitchen staff and runners are from Mexico. Every Sunday, during their break between brunch and dinner, one of the runners picks up tacos and tortas from a nearby Mexican joint for the staff. My favorite is carnitas, or slow roasted pork, with a simple traditional garnish of lettuce, onions, cilantro, lime, and a choice of red or green salsa.
Braised Pork Belly Tacos
At home, I like to make soft tacos with braised pork belly. Yes, pork belly has become almost a culinary cliche and it seems every day another restaurant in the city jumps on the bandwagon. But it is a wonderfully forgiving and flavorful cut of meat and slow braising pork belly makes it ultra tender and moist.  It is the cut of pork that bacon is made from, so there is a lot of fat, but slow braising renders out a good deal of it anyway.  The acidity of salsa verde, pickled onion, and lime juice, and the bright citrusy flavor of cilantro balance out the rest.  This recipe is adapted from a demonstration given by Aaron Sanchez at the French Culinary Institute while I was a student there.

You will  note that the recipe calls for annatto paste.  Derived from the seed pods of the achiote tree, it is commonly used in Central and South American cooking to add color and flavor.  I find it adds more color than flavor so you can omit it if you don't have any on hand.  Incidentally, annatto is also the pigment that gives Cheddar cheese it's orange glow.

Ingredients, for 4-6 servings

For the pork:
2-½ lbs. boneless skinless pork belly, cut into large chunks approx. 4 oz. each
1 c. fresh squeezed orange juice
1 c. white distilled vinegar
4-6 cloves garlic, crushed
1-2 Tbsp. annatto paste
crushed red pepper (optional)
salt & pepper
vegetable oil

For the garnishes:
thinly sliced lettuce
fresh cilantro leaves
lime wedges
2 dozen soft corn tortillas

Procedure:
1.  Preheat the oven to 350 degrees F and position the rack in the center of the oven.

2.  Lightly score the pork belly on the fat side by making a few 1/8" deep cuts.  Generously season the pork belly with salt and pepper.  Heat a few tablespoons of oil in a large skillet or flame-proof roasting dish over medium high heat until it shimmers.  Lightly sear the pieces of pork belly on each side.
Pork belly, trimmed and cut
Pork Belly, skin removed and cut into chunks
3.  Drain the excess fat from the pan and position the pieces of belly with the fat side down.  Add the orange juice, vinegar, garlic, annatto paste, and a pinch of crushed red pepper so that the liquid comes halfway up the pieces of meat. Cover the pan tightly with aluminum foil and bake in the oven 1-1/2 to 2 hours until the meat pulls apart easily with a fork.
Annato Paste
4. While the pork is cooking, prepare the garnishes.

5.  When the pork is cooked, let it rest covered in the cooking liquid for 5-10 minutes before pulling apart.  Once it has rested, shred the meat with a pair of forks, or your fingers and mix it with just enough of the braising liquid to coat each morsel.  Add salt to taste.
Braised Pork Belly
Braised Pork Belly
6.  Heat the tortillas one at a time in a dry skillet (cast iron works best) over medium-low heat until they are soft and keep them warm, wrapped in aluminum foil or a clean towel.

7.  To serve, place a little lettuce in a tortilla and top with pork.  Squeeze a little lime juice on the pork, and garnish with some pickled onion, salsa, and fresh cilantro leaves.

Quick Pickled Onions

A brief soak in a salty brine mellows the flavor of finely diced raw onion by essentially "cooking" it. Here is an easy recipe for quick pickled onion, that can be used as a classic garnish for Mexican tacos, Texas Chili, or Rhode Island Hot Weiners.

Ingredients:
1 cup white or yellow onion, finely diced or minced
1 tsp. kosher salt
1/2 to 3/4 c. white distilled vinegar

Procedure:
In a clean, non-reactive container, toss the onions with the salt.  Pour in enough of the distilled vinegar to cover the onions.  Let sit for 10-15 minutes before using.  Store tightly covered in the refrigerator for up to 10 days.

Tomatillo Salsa (Mexican Salsa Verde)

Though related to tomatoes, tomatillos should not be mistaken for green unripe tomatoes.  Unlike tomatoes, tomatillos have a thin papery husk that breaks open as it ripens.  The fruit itself has a tart citrus like flavor that is the signature of Mexican salsa verde.   The skin of the tomatillo is somewhat tough so it needs to be blanched in boiling water to soften the skin before using.
Fresh tomatillos
Fresh tomatillos
This is a basic recipe for tomatillo salsa (Salsa Verde) adapted from the one my fellow cooks use for family meal.

Ingredients, makes about 2 cups:
1 lb. fresh tomatillos, husks removed (approx. 4)
1-2 fresh jalepeno peppers (more if you like it hot)
1 small onion, chopped
1 bunch of fresh cilantro leaves, finely chopped
1/2 tsp. cumin
1 Tbsp. lime juice
salt, to taste

Procedure:
1.  Bring a large pot of water to a boil.  Add the tomatillos and jalepenos and cook until the tomatillos turn yellow.  Remove both the tomatillos and the jalepenos and cool them in ice water. Drain.
Blanched tomatillos
Blanched tomatillos
2.  Remove the stems from the tomatillos and jalepenos.  Combine all the ingredients in a blender or food processor and pulse until the mixture is a rough puree.

3.  For a more chunky salsa, blanch only the tomatillos, cool them in ice water, drain, then dice.  Stem and de-seed the jalepenos and finely dice them.  Combine the diced tomatillos and jalepenos with the remaining ingredients.
AMAZON