Tuesday, May 10, 2011

Eggs Benedict with Rosemary Pork Loin, Orange Hollandaise and Wild Arugula Salad

We're all pretty familiar with your standard Eggs Benedict: two poached eggs over a slice of Canadian Bacon or ham, on a toasted English muffin, luxuriously topped with Hollandaise sauce. Well here is a fresh take that makes use of leftovers from Saturday evening's pork loin roast. Combine them with with farm fresh organic eggs and produce, and crusty sourdough bread to make an elegant Sunday brunch.

This recipe also uses a number of techniques that are good to have in your repertoire.

Monday, May 9, 2011

The Difference is in the Brine

Why bother to brine a pork roast, a turkey, or a chicken?  Well, there are two reasons.  The first is that all three of these meats generally don't contain a lot of intramuscular fat and therefore tend to dry out when you roast or grill them.  Brining helps the meat to retain its juices, even if it's slightly overcooked.  The second reason is flavor.  A basic brine is made up of water, salt and sugar.  Soaking a roast, a bird, or even chops in this liquid allows the meat to become seasoned all the way through, not just on the outside.

Lately one of the things I like to keep in my larder is a pork loin roast.  A 1-1/2 to 2 lb. roast is the perfect size for my little household of two plus dog.  I brine it for about 2 hours, then sear it off, and roast it.  The whole process takes about 3 hours, largely unattended.  Properly cooled and left whole, the cooked roast with keep for about 3 days tightly wrapped in the fridge.   Then I just slice off pieces as I need to make grilled sandwiches or to have with eggs and toast.

Tuesday, May 3, 2011

Pulled Pork that Practically Cooks Itself


I ordered a pork shoulder through Basis Foods a couple months ago. The online store estimated each one at about 8 or 9 lbs. But when it arrived from Mountain View Farm it was a whopping 13 lbs, and...it was frozen. So I popped it in my freezer because unless I had a special occasion or a plan to make use of all that pork, there was no way the Buddy and I were going to be able to eat all of it.

Last week I finally thawed it out. The boneless half I sliced into steaks which I used to make Char Siu, and Tasso Ham. The bone end, which weighed about 7 lbs. became the easiest pulled pork ever. I looked up David Chang's recipe for his Bo Ssam in the Momofuku Cookbook, and was truly surprised at how basic his recipe was for marinating and cooking the pork: Rub pork with salt and sugar and marinate overnight. Cook pork, in a covered pan at 300 degrees until fork tender.

Sunday, April 17, 2011

My Almost Biscotti Disaster

"Eeek! "
That's the sound that came out of my mouth as a tray of half-baked biscotti logs slid off the oven rack and ended up  standing vertical with the edge of the tray stuck in the hinge of my oven door.  Luckily the actual logs of biscotti held on and didn't fall off.  When I righted the tray there were some casualties, but I was able to salvage most of my work.  So at least my first attempt at making biscotti wasn't a total disaster...

Read More...

Wednesday, April 6, 2011

All Aboard the Sous Vide Bandwagon


Okay, so I have been accused of being a little bit of a gadget girl.  But you can't blame me, it's genetic. Sources have informed my that my own father has been known to order computer equipment, then have it shipped to my sister's, whereupon she would bring it over as a gift.  My dad would exclaim something to the effect of, "Wow, how did you know this is exactly what I've been looking for?'  and my mom would be none the wiser.  Sorry guys, the jig is up.

Well, I've been wanting to get into sous vide cooking for some time, but it's not a technique that's necessarily used at my current job.  Until New York City Health Department developed standards regulating the use of sous vide, many restaurants were using the technique under the radar.  But now that most of the top restaurants in the city are certified to use sous vide, it has become quite commonplace.  After all, Thomas Keller's Under Pressure, a book demonstrating the use of sous vide in his restaurants, has been around for years, and there are very accessible pieces of equipment on the market now that make sous vide a very practical addition to the home kitchen.  So as a restaurant professional, there is no way I'm going to get left behind in the dust.

Sous vide is a French term meaning under vacuum.

Monday, April 4, 2011

Easy Pickled Jalapenos


Forgive me father for I have sinned (I imagine the late James Beard to be looking down at me with disdain from his kitchen in the sky).  It has been two weeks since my last post, and in that time I have twice eaten takeout pizza, and once I even had Taco Bell.  But it has been very difficult to have home cooked meals now that I am working more nights at the restaurant.  The powers that be have decided to expand the dining room, and add 50 more seats.  So after the departure of the Hulk, they have brought on a second, more experienced chef to help run the kitchen.  He and I have cooked together before, and as his sous chef I get to play more of a supporting role.  Remember that episode of Battlestar Galactica (the newer series) when Colonel Tigh had to run the ship while Commander Adama was recovering from a gunshot wound?  And remember the relief that he felt when he was able to return command to Adama?  Well, color me Tigh.  Now I get two full days off, but the other 5 nights are spent in the trenches, on the line, cooking with my crew until close.  So when I get home late and starving, pizza and nachos sound like a really good midnight meal.  The problem is that I always wake up in the morning feeling kind of crappy and regretting it.

Fast food and takeout are not cheap eats either, especially here in New York.  So I am on a new mission:  to  take a little time on my days off to stock my larder with fresh homemade goods from which I can make quick, delicious, and healthy midnight meals during the rest of the week. Having already discovered how easy it is to make home-cured meats, I figured I would add home-canned goods to my routine.

Monday, March 14, 2011

Steak and Kidney Pie, or the Dinner that Wasn't


"...not too much kidney...just enough to give it that touch of bite...and lashings of steak, oooh, and it's good steak too!...ooh." - from Jeeves and Wooster, Season 1: The Hunger Strike.

Is it possible we watch way to much Jeeves and Wooster?  Perhaps it's a sign, that after the 'teenth  time of watching Tuppy Glossup describe Chef Anatole's masterly Steak and Kidney Pie with such mouth watering anticipation, I finally needed to make one.

In keeping with the spirit of Jeeves and Wooster, I decided to use a British recipe for Steak and Kidney pie.  I remembered coming across a recipe in Hugh Fearnley Whittingsall's River Cottage Meat Book,  so I ordered some grass fed beef kidney and steak from Lewis Waite Farm.  Last week I finally had a chance to thaw  them out and work on the pie.

The thing is this:  When we made beef kidneys in culinary school, I could barely stand to taste them.  Yet Tuppy Glossup and Mr. Whittingsall managed to convince me that Steak and Kidney pie could be truly delicious.  Here I believe, was my first failure in judgment.  My second, was perhaps getting frozen instead of fresh kidney. After thawing it out (properly, i.e. in the fridge), I took the kidney out of the package, and started trimming it.  The center was still a little frozen, but as I continued to cut, it continued to thaw out.  It also began to give off a distinct odor of piss.  Not a strong odor, but it was there. 

Monday, February 21, 2011

Home Cured Bacon makes the Best BLTs

Home Cured BLT Sandwiches

Bacon, oh delicious bacon. Is there any other food that inspires people to the same degree of epicurean lust?  In one Jim Gaffigan standup routine, he spends a good two and a half minutes extolling the joys of eating bacon in its many forms. One waiter at work shared with me that having described a dish as containing bacon, he has had even more than one customer grunt "Yeah, bacon!" Bacon is equally delicious and dirty. It is salty, sweet and smoky all at the same time, not to mention luxuriously fatty. It is a guilty pleasure that connects us to an older more primal way of life. Since modern refrigeration has eliminated the need for us to even make bacon or other cured and smoked meats, it is something we do for the pure enjoyment of flavor.

A couple years back, we bought a Brinkman smoker for the house at an end-of-season sale. And a few weeks ago I got my hands on an entire slab of Berkshire pork belly, so naturally I decided to try making bacon at home. I consulted three different books on the matter: Jane Grigson's Charcuterie and French Pork Cookery (originally published in 1967), Michael Ruhlman & Brian Polcyn's Charcuterie, and Hugh Fearnsly Whittingsall's River Cottage Meat Book. What I learned was that making bacon really easy.

First, there's the Cure:

First you dry cure the belly in a mixture of salt, sugar, and whatever flavorings you may choose. Salt is the only essential ingredient, since it is the primary preservative. Beyond that, sugar and other flavorings are added to balance the salt, and a small amount of curing salt (a.k.a. pink salt, saltpetre) though not essential, is added to maintain the rosy pink hue of the pork and as a precaution against botulism. All three books vary greatly on their suggested ratios of salt to sugar. Ruhlman/Polcyn's cure is a ratio of 2 parts salt to 1 part sugar, plus 10 percent of their combined weight in pink salt. Grigson's cure calls for 2-1/2 lbs. of salt to only 1 oz. sugar, and 1 oz. pink salt. Fearnley-Whittingsall's cure falls somewhere in between. I decided to try two recipes: the River Cottage one and the Ruhlman/Polcyn one. The basic process is pretty much the same. Once you mix the cure, you just slather the belly with enough of the cure to evenly cover it, and set it in a container or ziploc bag in the fridge. The River Cottage recipe says to pour off any liquid that is released and rub the belly with fresh cure each day, Ruhlman/Polcyn directs you to simply turn the meat to redistribute the cure and the liquid. A 1" thick piece of belly will usually be ready in about 4 to 5 days. Then you just wash off the cure and you have what is commonly referred to as salt pork. Before smoking, let it dry in the fridge for a day or two. Drying creates a tacky surface on the meat known as the pellicle, which allows the smoke to adhere to it.

Then there's the Smoke:

Bacon, as commonly understood in America is then just smoked salt pork. The River Cottage recipe calls for cold-smoking the bacon, at a temperature of less than 100 degrees F (ideally 75°-86° F), for 24 hours continuously, or up to a week, intermittently. Ruhlman/Polcyn, call for a hot smoke, at 180° F to 200° F until the internal temperature of the bacon reaches 150° F. So again, here is a matter of personal preference. The longer the smoke time, the smokier your bacon will be. A cold smoke takes longer, but it is more difficult to maintain the proper temperature without special equipment. A hot smoke can be done in a charcoal grill in a matter of a few hours. Since I didn't have the proper equipment (or time, for that matter) for cold smoking, I decided to just go with a hot smoke. The difference is that hot smoking slow cooks the meat as it smokes, resulting in a final product that is essentially ready to eat.

To hot smoke meats, you can use a charcoal smoker, like the cylindrical kind, or a charcoal grill. The technique simply involves building an indirect fire, which roasts the meat rather than grilling it. The meat is not placed directly over the coals, but a distance above or to one side. In a cylindrical smoker, the meat is held on a rack a couple feet above the coals. In a charcoal grill, you would build your fire on one side of the grill, and place your meat on the other side, away from the coals. In both cases, the grill is then covered, trapping the heat and smoke inside so that the meat slow roasts the same way it would in an oven. If you use hardwood charcoal, you will get the smoky hardwood flavor without having to use wood chips. However, hardwood charcoal burns hotter and faster so you will probably have to keep a close eye on your fire. Using lump charcoal and wood chips is definitely easier. First soak your wood chips in water for about half and hour. In the meantime, light the coals. When they are glowing red, spread the wood chips over them so that they smolder and create the desired smoke. Then just place your meat away from the heat source, put the lid on, and slow smoke until the meat reaches the target internal temperature of 150° F.

So How Did it Go?

As luck would have it we experienced a warm spell last week - just as my bellies had just finished curing and drying, and were ripe for the smoking. It was 60 degrees outside and everyone was walking around t-shirts. Looking around, it was hard to believe we were still in the middle of February. So I went digging around in the basement for our smoker. I opened up the package, and what did I find inside but two copies of the complementary recipe book, but no assembly instructions. Thankfully, this was not a problem. After working in a futon shop in my post college years (thanks Lou and Lorrie) and having to assemble many a home furnishing product, I found the smoker was not much different. Charcoal, on the other hand, was a problem. As in, I didn't have any, and my car was in the shop. If I had had an electric hot plate, I could have rigged the smoker to work like the Big Chief electric smoker we use at work, but I didn't have a hot plate either. It's moments like these when a close-knit family of pack-rats is a definite blessing. I called my aunt and uncle who live down the street to see if they might have an electric hot plate or some charcoal kicking around. They couldn't find their hot plate, which they were sure they had but would have to go rooting around their basement to find. They did find an old 20 lb. bag of charcoal they had no use for, since they were grilling with propane nowadays.


Bacon, fresh from the smoker
By the time I got started smoking my belly it was close to dark, and we don't yet have lights out in our backyard, so I was out there with the belly, a pair of tongs, a bag of charcoal, a roll of newspaper, a butane torch, applewood chips soaking in a bowl of water...and a flashlight. But it was worth it. The hardest thing about the whole process was just getting the fire lit. But once I got the coals glowing in the bottom of the smoker, I just sprinkled the applewood chips over them, set the belly on the top rack of the smoker over a pan to catch the drippings, and closed up the smoker . Aside from checking the coals from time to time to make sure they hadn't burned out there was not much else to do. I think the temperature inside the smoker was probably higher than 200°F, but in about 2-3 hours, the belly had reached an internal temperature of over 150 degrees so I took it out and let it cool. It had turned an amber color from the smoke, and was glistening and smelled amazing too.

Today it snowed again, and it's hard to believe that just a few days ago it felt like Spring. We reminded ourselves by making some of the best BLT sandwiches ever. As I unwrapped the parchment package, the aroma of smoke was released into the air from the slab of homemade bacon. I cut a few 1/8" thick slices off the slab, arranged them on a parchment lined baking sheet and set them in a 350° F oven. In about 15-20 minutes they had rendered just enough fat, and were just beginning to crisp. I let them drain on a paper towel. Hmm-boy did they make some killer sandwiches. There are two things about homemade bacon that really make it stand out from the supermarket stuff. First it's drier, so it doesn't shrink and curl nearly as much. Second, its flavor is so far superior, and it is so easy to make, I don't think I can ever go back.


Yup, that's the good stuff.

NOTES:
Even though the package of wood chips I had said that you could use them dry, this method ends up creating flare ups that cause the temperature to get too hot, and create undesirable charring on the meat.

The hot smoked recipe I used said that the bacon would keep up to two weeks in the fridge or 3 months in the freezer.

http://www.youtube.com/watch?v=CaK9bjLy3v4

Friday, February 18, 2011

A Big Bowl of Red - Grassfed Steak Chili

A few weeks ago, I had the opportunity to represent the restaurant at Chelsea Market's NY Chilifest 2011. I along with representatives from our other two restaurants in our group, spent several hours ladling out some damn good chili and schmoozing away a Sunday afternoon. It was the first public cooking event I participated in and I had no idea what to expect. All the meat for the chili cookoff was provided by Dickson's Farmstand Meats, and ticket proceeds were being used to support Food Systems NYC - both supporters of local and sustainable food production. Restrictions allowed three people from each restaurant to attend and serve their (hopefully) award-winning chili to 1200 people, and promote their restaurant. One of the tricky things was how to transport 50 gallons of hot chili to the event and keep it warm on only two small hot plates. The solutions were as varied as the chilis. One of our neighbors even brought their own electric steam tables and trays, only to find that there was no access to power - only butane.

The event started at 4pm and for the first couple of hours there was just a sea of people stopping from table to table, chili mug in one hand and a beer in the other. There were television people there, filming, and asking each team to describe their chili. There were also a host of photographers, one of whom stopped me at one point, saying "that's perfect, don't move." At another moment, I turned around to find a mic in my face and a video camera pointed at me. My cohorts had thrown me to the wolves. Here I was, having had nothing to do with preparing our chili, yet now being asked by a reporter to describe it. I am sure during the course of this event, I did or said something dumb that is somehow going to end up in print with my real name attached to it. Oh well.

By the time two hours had elapsed, even the most hearty looking chili-eater was passing our table by, putting a hand over his stomach and gesturing that he could eat no more. And at 6:30 the judges had made their decision and announced the winner of the competition. Unfortunately the judges did not award us the Golden Chili Mug, but we got a good response from the public, and our chili was pretty much gone, so we took the chance to sample some of our competition. There was everything from Texas style "bowl of red," sans beans, to very traditional Mexican style chili, to more unexpected and modern "chef" interpretations. Of course, Fette Sau, a barbecue joint located in Williamsburg added some pork to their chili, and Telepan presented a green chili that contained kernels of hominy. Even the Food Network test kitchen had a table. The aroma of beef, chiles, and spices from the various tables lingered throughout the concourse at Chelsea market. I could only imagine the aroma that could very well follow as 1200 people digested the 20-30 ounces of chili served to them by all the restaurants, and all the beer provided by Brooklyn Brewery. Once our chili-pot was empty, we certainly didn't stick around long enough to find out.

Since I didn't actually participate in the chili-making for the event (credit goes to my executive chef and his team at my former restaurant), I have been meaning to put up a big pot of red chili for me and the old boyfriend. After some hectic days at the restaurant following the departure of the Hulk, and gearing up for Valentine's Day, I finally had a day off. So last night I thawed out 2 lbs. of Manx Station Farms grass fed steak I had knocking about my freezer (from Basis Foods, of course) and made a pot of slow cooked steak chili. I often make a chili with spicy chorizo, chipotle peppers, and mole style spices. But this time I decided to keep it simple and go with a basic American style chili: red and black beans, tomatoes, onions, red bell pepper, garlic, chili powder, cumin, and cayenne. Okay, so I did add a little cocoa powder at the end for some richness, but just a little. We enjoyed it in front of the tube, watching one of our more recently discovered favorite movies: Jeff Daniels' Escanoba in da Moonlight. In case you haven't seen it, think The Hangover, meets Parenthood but better.

Grassfed Steak Chili

INGREDIENTS:
2 lbs. grass fed (or whatever) steak, diced
vegetable oil
1 large onion, diced
2 red bell peppers
1/4 c. chili powder
1 Tbsp. ground cumin
1 tsp. cayenne pepper
6 cloves of garlic, minced
1 Tbsp. tomato paste
14 oz. cooked black beans
14 oz. cooked red kidney beans
28 oz. can of crushed tomatoes
water
1 Tbsp. unsweetened cocoa powder
salt and black pepper to taste

PROCEDURE:

1. Coat the bottom of a large dutch oven with oil and cook the onions and red pepper with the spices over medium low heat until soft. Add the tomato paste and garlic and cook for a few seconds until the garlic is fragrant.

2. Add the meat and cook until it is no longer pink. Add the beans and tomatoes, and enough water to cover all the ingredients. Simmer gently, covered for 45 minutes, then uncovered for another 45 minutes. until the meat is very tender. Stir in the cocoa powder and add salt and pepper to taste.

3. Serve garnished with sour cream or grated monterey jack cheese and sliced green onions.

TIP: Chili, like stew always tastes better the next day, after all the flavors have had a chance to mingle.

Try this with : Maple Glazed Cornbread

All the meat for the chili cookoff was provided by Dickson's Farmstand Meats, and ticket proceeds were being used to support Food Systems NYC - both supporters of local and sustainable food production.

The Hulk has Left the Building

"You won't like me when I'm angry."

I had only heard about him, this bad ass cook we had working at one of our sister restaurants.  A legend in his own time, he could run a busy saute station like no one else.  He owned that station - as he should, after working it for 8 years.  He also had a legendary temper.  So naturally, last July when the most recent chef de cuisine gave notice, and the company offered me the job, I was a little nervous.

Okay, a lot nervous.

After being given a sous chef position with only a year and a half of cooking experience, I already had enough on my plate.  Three months later the company wanted to me to take over as chef de cuisine at another restaurant?  Not only was it another kitchen with a totally different menu, but it was a kitchen that easily turned out double the food volume.  And did they forget that the kitchen was staffed completely with Latino men, all of whom had been cooking there for several years?  What business did I have coming in and taking charge of their kitchen?  Despite my reservations, both executive chef and owner assured me that the kitchen staff was all on board and that I would have all the support I needed.  Nothing could have been further than the truth.

After several weeks of hitting my head on all the low hanging pipes and low passages of my new kitchen, it became quite clear that my primary mission was to babysit - one that if not handled delicately could bring on a cold shower of resentment from my new staff.  During those first few weeks, I worked every day, getting to know the restaurant, the menu, the routine for every service...I came to rely on my receiver/ butcher for essential advice about inventory and how to manage food costs.  He was also my eyes and ears when it came to keeping an eye on the cooks, making sure they were prepping fresh ingredients every day, and keeping on top of food quality and consistency.  "Check the pickles," he would say, pointing out that they were sometimes inconsistent in flavor and color (from the turmeric).  Then after a few months he quit, and so did one of my strongest cooks.  In the month of October I probably had only two days off. I took care of all the receiving and butchering while we looked for replacement cooks.  I took this as an opportunity to prove to my cooks that I could work just as hard if not harder than they did.  Some days I was at the restaurant for 16 hours at a time, and in the midst of it all there were a slew of private functions - weddings, engagement parties, birthdays, holiday parties, etc.  There were times I thought I was going to lose my mind.  At it's worst, I found myself curled up in a ball in the corner of my office, very likely indistinguishable from a quivering ball of snot.  But every evening at 6pm I somehow managed to pull myself together, put on my game face, and face the next service.

Then there was the Hulk.

The Hulk was the biggest battle I was up against at the restaurant.  Everyone on the staff agreed he was like two people.  When he was in a good mood he was like David Banner - easygoing and cooperative.  Then there was his other identity - the spiteful and angry one that slammed pans around and alienated everyone around him.  His attitude toward me was one of constant intimidation.  During service he would either purposely ignore me when I asked him a question, or answer me as if it were so obvious only an idiot would have to ask.  Very rarely did it seem as if I weren't inconveniencing him somehow.  He was like some territorial predator, and I was the trespasser on his hunting grounds.  Only when he needed something from the powers that be, did he treat me with any respect whatsoever.

Toward the end of our time together, I did see some glimpses of hope that things might work out.  One slow evening, I got to see Dr. Jekyll instead of Mr. Hyde, and got him talking about menu ideas.  The next week we worked on some of his ideas and sold them as specials and it seemed to put him in good spirits.  Then, after a particularly difficult weekend service, I got to have a little heart to heart conversation with him in which he seemed to open up and agreed to try to find better ways for us to work together.  But it was not to be.  A week later, in the middle of Friday dinner service, I was trying to resolve an issue a mis-printed order and he told me to shut up.  When I wouldn't back down, he had a meltdown, yelling, "F*** this place!" and stormed out of the restaurant.  I'm sure he thought things would fall apart without him.  But you know what, the show must go on, and it did.  I had already been training one of my strongest grill cooks to work the saute station, so that evening I told him to do just that, and I would cover his end of the grill.  Suddenly everyone stepped up their game, including me.  The food runner was calling out orders and expediting, everyone was suddenly talking and communicating with each other.  This was no time for ego or grandstanding.  We were all in it together and we just had to get through the night's service.  After it was all over, it was like a weight had been lifted.

That's right, ladies and gentlemen, the Hulk has left the building.

Tuesday, February 1, 2011

BBQ Chicken Wings, Braised Greens & Cole Slaw

Collard Greens, Lacinato Kale, Savoy Cabbage, Leeks... These are just some of the things I had lingering in my fridge from my last delivery from Basis "Good Food to You". Since you can click the link and check them out, I won't say too much on the subject except that it's kind of a cross between a CSA and a grocery delivery service that only delivers sustainably raised fully traceable goods, including milk, dairy, and meats. They do not yet deliver to Eastern Queens, but lucky for me I work (and pretty much spend most of my waking hours) in Brooklyn. The produce bag is always a surprise mix of seasonal items, some familiar and some more unusual. I signed on as a way to challenge myself to use ingredients that I may have never encountered before. One week I received Japanese Purple Sweet Potatoes, which were such a revelation I had to order some for the restaurant and worked them into a special with Salmon and Blood Oranges.

But I digress.

Yesterday, I had to find a way to make use of the greens and cabbage I had before they wilted. Braised Southern Style Greens and Cole Slaw seemed like logical (and delicious) ways to make use of this wonderful produce. BBQ Chicken wings and Three-cheese mac n cheese rounded out the meal. For the greens I consulted James Beard's American Cookery. His recipe calls for Collard, Dandelion, and Mustard greens, but I had Collard Greens and Lacinato Kale. His recipe called for ham, but I had a couple chunks of pork belly and a bit of bacon in the freezer instead. Isn't seasonal regional cooking all about adapting cooking techniques to the ingredients available to you anyway?

So sorry folks, but I don't have recipes to share in this post. Instead here are the techniques:

Basic Braised Greens


Hearty bitter Greens such as Collards, Dandelion and Mustard, with tough stems and veins lend themselves very nicely to braising (and pork). The method is simple. Trim, chop and thoroughly wash your greens. Do not dry, but set aside. In a large saucepan, brown diced bacon or whatever pork product you choose to use. If you are using lean meat, you will need to use some oil or fat. (If you do chose to use ham or some other already cooked meat, skip this step and just add it at the end instead). Add the wet greens to the hot pan of meat and fat, and wilt until they turn bright green (see photo above). Add a splash of vinegar (or lemon juice) and some water to the pan, not to cover but just enough to form a puddle at the bottom of the pan and keep the greens from scorching as they cook. Season the whole lot generously with salt and reduce the heat so the liquid is barely simmering. Cook gently until the stems of the greens are just tender (this may take a while if they are thick), tossing them from time to time and adding water as needed. Oh, and when I say season generously, I mean generously. It's the salt and vinegar that takes the bitterness out of the greens. I also like to add a sprinkle of crushed red pepper flakes to the greens as they cook for a little bit of heat.

Basic Cole Slaw

When I make cole slaw, I like to wilt the cabbage first by salting it and letting it weep. This draws out extra moisture so the cole slaw doesn't taste so crunchy and raw. To do this, cut, core, and thinly slice the leaves of a head of cabbage. Toss the cabbage in some salt and set in a non-reactive colander to drain for about an hour or so. After it has wilted slightly, rinse the cabbage and drain well. To make the cole slaw, add shredded or finely diced red onion and if desired, shredded carrot. Mix everything with enough mayonnaise to coat, and add vinegar or lemon juice, salt, and sugar (or honey) to taste. Flavorings you might choose to add could be dijon mustard, toasted celery seed, or even some chili paste or siracha (it complements mayo like you wouldn't believe). Refrigerate and let the flavors meld for a couple hours before serving. You may need to freshen it up with a little lemon juice or vinegar before serving.

Basic Barbecue Sauce

Here is an easy formula for a basic barbecue sauce: 1 part molasses, 1 part ketchup, 1 part vinegar. Just heat the mixture up in a saucepan until the vinegar reduces and the sauce is the right consistency. To that, you can add whatever flavorings you wish: a splash of Tobasco or Frank's Hot Sauce for heat, bourbon, Triple Sec, or some other kind of liquor, hoisin or soy, for an Asian spin, Chipotle peppers for a little Latin kick, horseradish, cocoa, or instant coffee just to name a few. On this particular evening, I didn't even bother with reducing the sauce. I just marinated the chicken wings in the BBQ mixture and put the whole lot in a Pyrex dish in the oven at about 375 degrees, brushing the wings with the pan drippings as they cooked. By the time the wings were cooked most of the vinegar had evaporated and left a thick delicious mess in the bottom of the pan. I just tossed the wings around a bit before arranging them on the plate and pouring the sauce from the pan over them. By the way my BBQ flavoring of choice this evening? Chili Sambal.

The Disclaimer

Okay, so here's the thing about using method over recipes: A lot of it is trial and error, but rule #1 is you must taste everything as you go along (except of course raw chicken and the like). You need to use some judgment and make adjustments along the way as needed. For instance, if you decide to take the lazy way out like I did with my chicken wings, and there's too much space in the pan, you may end up with a black charred crust in the bottom of that pan before your chicken is cooked. Then by all means mix some warm water into the pan before you reach the charred black crust stage! Oh, and rule #2? Where there is room for experimentation, there is also room for much error. On this occasion all went as planned, but that is not always the case. Eh, so sometimes things that seem like a good idea don't always work out on the first try. In those cases, if I can figure out what not to do the next time, at least I've learned something.

Monday, January 24, 2011

Maple Glazed Cornbread, a Delicious Meeting of North & South


Have a bite of this with your morning coffee!
I am obsessed with cookbooks, as I am sure most avid cooks and food bloggers are. From my slowly growing collection I make lists and lists of recipes, techniques, and new things to try. I especially love when the author gives us a little glimpse into how the recipe evolved, information about the ingredients, and where they come from, etc. Still I find my favorite recipes usually come to me not from cookbooks, magazines, internet, or a food focused television network (need I speak the name?), but by word of mouth. This cornbread is made from one such recipe.

The original recipe was given to me by a pastry cook friend of mine, who was sworn to secrecy by her friend, whose Southern forebears would probably roll over in their graves knowing that their heirloom recipe had been passed along to a Yank like me. Until that day I had never been able to produce a moist delicious cornbread from any recipe I tried. Even the Joy of Cooking let me down, and forget the recipe on the back of the cornmeal package. Every attempt resulted in dry, crumbly bread - barely edible when fresh, and definitely not edible the next day. This, I have sadly come to learn, is what distinguishes Northern style cornbread from it's Southern cousin. Northern cornbread is traditionally a savory affair, with a higher proportion of cornmeal, often omitting flour altogether. Was I wrong to want the kind of cornbread I loved at barbecue joints - that sweet, moist bread that was just perfect for mopping up sticky meaty barbecue sauce dripping from a rack of St. Louis pork ribs?

Well, this was it. However, my adaptation differs from the original on two points. First, the recipe given to me called for a portion of cake flour, which is not something I always have on hand. I make it with 100% all purpose flour and actually prefer that it's not as cakey and has a nice looser crumb. The second adjustment is in the glaze. The original recipe calls for a glaze of honey, butter, and water, but I have added that old Yankee flair by using maple syrup in place of honey, and adjusting the proportions to account for it. Applied after the cornbread has baked and has had time to cool slightly, the glaze is the magic key to keeping it moist and buttery. It is even good cold, and will never need to meet a pat of butter. It keeps well, stored in an airtight container at room temperature for up to two days, but I have never seen it sit around for that long.

By the way, anyone who wants to try the original recipe can send me a message and I will be happy to send it to you. However I cannot so publicly breach a confidence as by publishing it. Cheers.

INGREDIENTS, for (1) 9" x 13" cake pan:
2 c. cornmeal
2 c. sugar
2-1/2 c. all purpose flour
2 Tbsp. baking powder
1 tsp. salt
4 eggs
1/3 c. corn, or other neutral cooking oil
1 c. milk
1/2 c. buttermilk
3 oz. (6 Tbsp.) brown butter (see step 3 below)

GLAZE:
1-1/2 oz (3 Tbsp.) butter
1/3 c. pure maple syrup (not the fake stuff, please)
1-2 Tbsp. water
a pinch of salt (optional)

PROCEDURE:
1. Preheat oven to 375 degrees. Spray the baking dish or grease with butter.

2. In a large bowl, whisk together the cornmeal, flour, sugar, baking powder, and salt. In a separate bowl mix the eggs, corn oil, milk, and buttermilk.

3. Meanwhile, make the brown butter. Place the 3 oz. of butter in a small saucepan or saute pan and melt over medium-high heat. Watch it. First the butter will melt, then it will start to foam as the fat separates from the milk solids, visible as white granules or clumps. Once all the water in the butter has evaporated, the milk solids will start fry. Once they are lightly browned and take on a nutty aroma, the butter is ready. Remove immediately from the heat, and be careful because brown butter is VERY HOT. It will continue to cook even after you have taken it off the heat , so let it cool some before using it. Also, take care that you don't burn the butter or it will impart a bitter, carbon like flavor to your bread.

4. Make a well in the center of the dry ingredients and pour in the egg and milk mixture. With a few swift strokes of a wooden spoon or whisk, mix them together briefly. Pour in the cooled brown butter and stir in immediately until the batter is just smooth and uniform, taking care not to overwork it.

5. Pour the batter into the baking dish and bake in on the middle rack of the oven for 30 minutes or until a skewer stuck in the middle comes out clean or with only some crumbs sticking to it. Let cool 5-10 minutes.

6. While the cornbread cools, make the glaze by simply heating all the ingredients together in a small saucepan until the butter is melted. Whisk or stir it briefly to combine the butter with the water and syrup. Using a pastry brush, dab the glaze all over the top of the cornbread. Allow the glaze to absorb and set before cutting the cornbread.

Sunday, October 31, 2010

The Importance of Being...Inspired

Oh a busy busy busy bee is me! I know it's been months since my last post, but between having a new puppy, caring for old cats, resolving yet another car accident (not my fault, I wasn't even in the car), my novice attempts at gardening, and the demands of the restaurant, I don't know where all that time went. A girl can get pretty jaded, living in such a whirlwind. Thank goodness I recently had a birthday, which always makes me restless to shake up my routine, and reflect on what my goals are for the next year to come. Some people make new year's resolutions. Instead I make birthday resolutions.

Resolution number one is to actively stay inspired. Sure, a strong routine can be very valuable for a line cook. It helps you set up your station on time, multi-task during service, and strive toward machine-like precision and consistency. But it can be very easy to let the machine take over and to forget why you're working so hard in the first place. So I'm trying to take better advantage of the city, and see what other chefs are doing from my ever-growing list of restaurants to check out. On a line cook's pay, that's certainly not easy, but at least on my birthday, Boyfriend was picking up the tab!

So for my birthday dinner I chose Degustation, one of the top restaurants on my list. Serving a menu of small plates from an open kitchen surrounded by only 19 seats, it's definitely a restaurant designed with industry folks and food & wine enthusiasts in mind. A friend who recently left the kitchen at Prune to follow her med student fiance to Grenada (winter in the caribbean? me? jealous?) raved about Degustation after having their anniversary dinner there a few months back. Then one of our cooks who recently relocated from the west coast touted his meal at Degustation as among the best he's had. Then when I told one of our bartenders I was considering going there for my birthday he said it was the best meal he'd ever had, and if I had any trouble getting reservations he knew someone who knew someone... So I figured it was time to go and see what all the fuss was about. My day off that week fell on a Tuesday, so I called Degustation that afternoon to make reservations for two. They could only fit us in either really early at 6pm, or later at 9pm because they were expecting a large party at 8pm. 6pm was too early so we took the 9pm reservation.

Degustation's unassuming exterior

Degustation's entrance, located on E 5th street off 1st avenue, is simple and unassuming. We almost walked right past the restaurant and probably would not have even noticed it if we weren't looking for it. In the dark, the name was barely visible on the solid front door, and the only light was a warm glow that emanated from two square, porthole like windows. We entered through the heavy door into a space that was contemporary and chic, yet warm and comfortable. The host greeted us and immediately showed us to our seats. I was delighted to find that we were seated right in front of the chef 's station, where executive chef Wesley Genovart was artfully plating all the food.

We started off our evening with a couple of beers as we looked over the menu and tried to decide whether or not to try a tasting menu. Boyfriend stuck with his usual Amstel light, while I sipped an Alhambra Negra, a dark Spanish lager with a soft caramel like flavor. The small plates menu featured a crudo of seasonal fish, coca mallorquina, carabinero, and other items also inspired by the chef's Spanish up-bringing. In addition to the a la carte small plates, the restaurant offers a five course tasting menu for $50 per person, and a 10 course tasting for $75 per person. When asked, our server kindly explained that both tasting menus were pre-determined for the evening and that the five course tasting featured only menu items, while the 10 course tasting also featured special items that changed daily, such as sweetbreads and some other things that I didn't hear after she mentioned sweetbreads. So we chose the 10 course tasting. Our server asked us if we had any allergies, which they would be happy to accommodate. No, we didn't, but Boyfriend was really excited to see oxtail among the small plates, so we asked if that might be included as one of our courses. "I'm sure we can make that happen," she replied.

The meal started with an amuse-bouche of two bite size menu items: a pork croqueta and Spanish "tortilla" filled with quail egg and shallot confit. The croqueta was crispy and flavorful, and paired nicely with its bed of paprika spiced aioli. The tortilla was much more delicate in texture and subtle in flavor. While I could appreciate the contrast, it seemed strange to pair the two on the same plate. It did a slight disservice to the tortilla, which I think was good, but whose subtlety was somewhat overpowered by the more assertive croqueta next to it.

Pork Croqueta and Spanish "Tortilla"
The first course was a delicious chilled marcona almond soup, simply garnished with chives, pea flower, and a marcona almond. It was milky and smooth, and perhaps there was just the slightest suggestion of roasted garlic which pleasantly enhanced the salty sweetness of the almonds.


Chilled Marcona Almond Soup

Our second course was a crudo of spanish mackerel served over tomato granita and topped with crispy slivered garlic and serrano chiles. The fish was fresh and firm, and I thought the tomato granita added nice chill and acidity to an otherwise oily fish, but Boyfriend did find the garlic too overpowering.


Crudo of Spanish Mackerel

Next, we were served the Puerro Salda, a warm pureed potato leek soup garnished with octopus, a Barron Point oyster, and padron pepper (which I believe was in the form of a green infused oil). Boyfriend did not like this soup. He found it overwhelmingly "fishy." I could see where he got that, since it had a familiar flavor that was reminiscent of braised abalone I'd eaten at Chinese wedding banquets as a child.

Boyfriend and I shared much discussion about the next dish, which was a trio of sardines. One was simply pan seared and served over roasted red pepper. The second, our favorite preparation, was the chef's play on a sardine sandwich, and featured a sardine seemingly dusted with rice flour, then fried and served over pickled onion and topped again with serrano chiles. The sardine was pleasantly crispy and the onions were tart and I thought I detected a hint of fish sauce in the brine. The third and least favorite was a sardine fillet rolled and served over sauce gribiche, whose flavor Boyfriend likened to the smell Tester's modeling glue. Humbly I must admit that I don't know what sauce gribiche is supposed to taste like, but I had to agree with Boyfriend on this one.

Trio of Sardines

Next the servers brought us bowls of seared durade with matsutake mushrooms, and eggplant. At the table, they finished the dishes with a matsutake mushroom broth. This was our fifth course, (sixth, if you include the amuse) and to be truthful, by now I was beginning to feel the food equivalent of "Museum Fatigue," a term from my art school days used to describe the kind of sensory overload and subsequent shut-down caused by viewing too much artwork in one visit to the museum. So I have to say that outside of enjoying the broth and the texture of the eggplant and the fish, I can't recall much about the dish's flavors.

Amazingly enough, the next course was just the thing to bring my senses back to life: a warm duck egg mouse with tiny brioche croutons, smoked maple syrup and a strip of lamb bacon all served in the eggshell. It was perfect. The mousse was light, airy, and was just the right temperature to evoke the warmth of a freshly laid egg. The croutons and the bacon were nice and crunchy, and the syrup underneath the mousse added a great sweet smoky finish. I asked Boyfriend, who normally does not like the flavor of lamb, what he thought of the lamb bacon, and he replied, "C'mon, it's bacon, of course it's good."


Duck Egg Mousse
After having my senses re-awakened, and hearing the server describe it, I was really excited about the next dish: coca Mallorquina with sobresada, wild mushrooms and a red wine reduction. It was good, but after experiencing the perfection of the duck egg mousse, I have to say the coca Mallorquina was a little disappointing. Inspired by a Spanish style pizza or flatbread typical of the Mallorca region, the crust was crispy, but the sobresada seemed a little dry and chewy, and the flavors, though good, were kind of lackluster.

Finally, grilled sweetbreads! I have to admit I had only had sweetbreads either dusted with flour and pan-fried, or poached and glazed with a veal reduction like they did in culinary school. The first being light and crispy on the outside, and rich and creamy inside, the second is just gross. Here however, chef Genovart presented us with grilled veal sweetbreads served over a of succotash-like mixture of fresh corn, green beans, crispy okra and chanterelle mushrooms dressed with tomatillo salsa and cilantro. This was a texture and flavor I had not experienced with sweetbreads before. The char from the grill changed the flavor of the sweetbreads by adding what I can only describe as a kind of bite. Grilling also gave it a supple yet meaty texture that was pleasing to eat, and the acidity of the tomatillo salsa in the corn mixture was just the right foil to the richness of the sweetbreads. Boyfriend and I both really enjoyed this dish.


Grilled Sweetbreads


Then came the dish Boyfriend was waiting for: potato "Cannelloni" filled with oxtail and grilled on the plancha, served with crispy shallot, a fresh herb salad and radishes. This was a delicious and enjoyable dish. The cannelloni was actually thinly sliced potato wrapped around a tender filling of braised oxtail. The potato had a crisp sear from the plancha, the radishes were a peppery accompaniment, and the herbs added a nice freshness to the dish. This was the last savory course and was a good way to move onto dessert.


Oxtail with Potato "Cannelloni"
But wait! Before dessert we were presented with a lovely cheese plate, with birthday wishes from my bartender friend. What a nice surprise. It featured cheeses from Spain and Switzerland accompanied by a marcona almond puree, fresh honey on the comb, black currant preserves, and a poached pear.


Surprise Cheese Plate
Last, but not least, dessert was a simple yet delicious bread pudding of brioche soaked in cream, then caramelized on top, and served with fresh berries. Our server said it was a dessert very typical of the Basque region. As we enjoyed our dessert, we chatted a little with chef Genovart as he and his crew packed up their stations (by now the restaurant had been closed for almost a half hour) and dutifully scrubbed everything clean. I thought of how this crew was expected to perform every evening, with all their actions totally exposed to their patrons, and from the eater's point of view, how our reactions and comments about the food were visible and audible to those preparing it. I pondered on how different this was from the closed kitchen, where among the din of servers coming in and out of the swinging door, the clang of the dish machine hatch opening and closing, the scrambling of dishwashers rushing to restock clean pans and collect dirty ones from the line, and the voice of the chef calling out orders, our only connection to the dining room is through the waitstaff.

Overall I would have to say that our meal at Degustation was a really good one. At $75 per person, it was well worth it for a 10 course tasting, and at the end of the meal I was satisfied without being full. The servers described each dish as it was served, and patiently answered any questions I had about particular components. The dishes were generally well executed and good, although some were definitely more memorable than others. We'll definitely go back, but now that we've had the tasting menu, there are some other items on the small plates menu we would like to try, and some dishes from our tasting that we would order a la carte. As for my birthday resolution, it was a great success. I definitely left feeling re-freshed, and inspired with ideas for new ingredients, techiniques, and combinations I'll be trying myself.

Thursday, June 17, 2010

Chicken Soup with Fresh Spaeztle

Chicken Soup with fresh Spaeztle, made from remnants of a failed experiment.
Cooking can be very frustrating when things don't work out as planned. Last week I was so excited about finding fresh cranberry beans at my local market I had to pick some up. Along with that I picked up some kielbasa, a chicken, and some basics: onions, carrots, celery, herbs etc. It was unseasonably cool, and I had in mind a one-pot meal of braised chicken with pork and beans. Well, I won't go into the gory details, but it wasn't one of my best laid out plans. My estimated cooking times for all the different ingredients were off - a very important factor if they are all going into the same pot, I might add - and I ended up with undercooked beans, and dry, bland, chicken. Well, all the stereotypical temperamental chefs came to life in my kitchen that evening - so much so that I heard the boyfriend whisper to Sadie, "Leave mama alone, it's not safe in the kitchen right now." When I was through throwing my tantrum, I wrapped the chicken up and put it in the fridge, finished cooking the beans through, then seared some slices of kielbasa, and fried a couple of eggs. We ended up having mediocre but edible Kielbasa and Beans with Fried Eggs for dinner.

The one positive result of that evening was that I managed to use all the chicken carcasses I had stored up in my freezer to make a giant batch of chicken stock. It really came in really handy a couple days later, when the boyfriend came down with a cold and a bad sore throat. Cheers! Chicken soup to the rescue. I love a good chicken noodle soup, and having fresh chicken stock, and leftover chicken in the fridge always makes quick work of it. I didn't have any egg noodles in my pantry, but I did have eggs, flour, and milk to make Spaetzle instead. It was so quick and easy, I don't think that my Chicken Soup will ever see another dried egg noodle.

Chicken Soup with Fresh Spaeztle

INGREDIENTS, makes about 3 quarts
3-4 Tbsp. neutral oil (such as canola or grapeseed)
3/4 cup diced carrots
3/4 cup diced celery
1 cup diced onion
1 clove of garlic minced
2 quarts chicken stock, preferably unsalted
a bouquet garni of fresh thyme, oregano, and a bay leaf, tied together with twine or bound in cheesecloth
salt and pepper
the meat of one 3-4 lb. chicken, cooked, skin and bones removed, and cut into 1/2" chunks

For the Spaeztle:
2 eggs
1/3 cup milk
1/4 tsp. salt
pinch of nutmeg
pinch of cayenne pepper
1 cup flour (6 oz. by weight)

SPECIAL EQUIPMENT:
A stockpot with a fitted steamer insert or a metal/heatproof colander that will rest on the rim of your soup pot.

PROCEDURE:
1. Combine the carrots and celery and a couple tablespoons of oil in a tall 8 quart stockpot. Season with salt and pepper and cook over medium low heat for about 5 minutes. Add the onions and garlic, and additional oil if needed to coat the onions, and cook for another 5-10 minutes or until the onions are translucent.

2. Add the chicken stock and herbs, then turn the heat to high and bring the mixture to a boil. Lower the heat and simmer gently until the celery and carrots are almost cooked through.

3. Meanwhile make the spaetzle batter. In a medium bowl, whisk together the eggs, milk and spices. Then add the flour and mix with a whisk or spoon until uniform. Cover the bowl with plastic wrap and set aside.

4. When the vegetables are close to cooked through, transfer the spaeztle batter the colander or steamer insert. Place the steamer insert in the stockpot, or if you are using a colander, rest it on rim of the stockpot. There should be a couple inches of space between the bottom of the insert/colander and the liquid. Turn the soup to high and using your rubber spatula, push the batter through the holes of the colander so the pieces drop into the boiling soup. It will only take a minute or so for the spaeztle to float to the surface - a good indication that they are cooked. When you think you have enough noodles, simply remove the insert/colander and discard any remaining batter.

5. Add the cooked chicken to the pot and bring everything back to a boil, just to warm the chicken through. Season to taste with salt and pepper.

Notes:
The recipe calls for a generous amount of chicken stock to account for the liquid absorbed by cooking the spaeztle directly in the soup. I prefer this method only because the starch adds body to the soup the same way adding pasta cooking water to sauces does. You may prefer to cook your spaeztle in a separate pot of salted water to have better control over the cooking process.

This recipe is best made with homemade Chicken Stock.

Wednesday, May 19, 2010

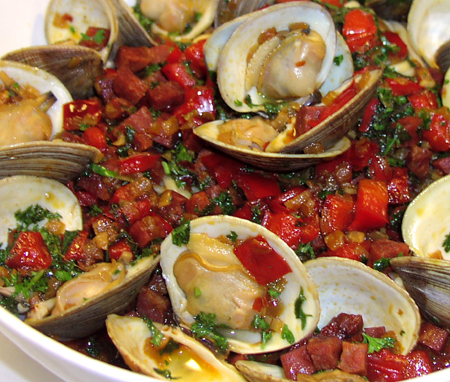
Linguine with Chorizo & Clams

Wednesday is my Sunday. It's the only day of the week that I'm sure to be off from work ,and usually all I want to do is relax at home with my cat asleep on my lap, or run around the park with Sadie. So lately, we've just been ordering in or eating at someplace local on my night off. Thing is, the eatery options in Eastern Queens are pretty, well, blah. (Any foodie neighbors with suggestions please let me know!) There are a couple of good pizzerias, a decent Indian restaurant, and several late night diners, but this girl can't live on pizza, curry, and burgers alone. Oh what I'd give for an authentic Mexican joint that's not run by the Chinese take out folks next door! There's nothing like having a craving for something good and ending up with a bland and disappointing meal. It's enough to drive a lazy cook back into her kitchen!

So this week, when I had a craving for seafood, I decided to take matters into my own hands. At least if the meal was a flop, I would have no one else to blame but myself. I have to say, I wasn't planning on getting clams. Pretty much every clam we've eaten in New York has had an unpleasant and bitter metallic finish that is unlike any clam we had in New England. But today I was visiting a new fishmonger who had both farmed Long Island clams, and wild caught Connecticut clams. He seemed to think the bitterness could be from the farmed clams. I was skeptical, but decided to gamble on the wild Connecticut clams and took a dozen of them home. Although they weren't as sweet as Rhode Island clams, they certainly didn't have a strong bitter finish, and I think the preparation helped to mask it.

At first I was going to go with a simple linguine and white clam sauce, but when I got home, I realized that I didn't have any white wine. I did have an open bottle of pinot noir, plenty of beer, red pepper and chorizo, so I ended up going in a more Spanish inspired direction. Improvising can be tricky, and believe me I've had my fair share of flops, but sometimes things do work out. Here's the recipe, approximately:

INGREDIENTS (serves 2 very generously):
4-5 Tbsp. extra virgin olive oil
1 large spanish (yellow) onion, diced small
1 large red bell pepper, diced small
3-4 cloves garlic
pinch of saffron
4 oz. dry chorizo sausage, diced small
1/2 lb. dry linguine or other pasta

2 plum tomatoes, seeded and diced
1/4 c. medium bodied red wine
1/4 c. lager beer
crushed red pepper
1 dozen small clams, such as cherrystones or liittlenecks, scrubbed clean
1/2 c. chopped fresh parsley
1-2 Tbsp. chopped fresh cilantro (optional)
salt and pepper

PROCEDURE:
1. First make a sofrito: In a medium sauce pan over low-medium heat, slowly cook the onions and red pepper in plenty of olive oil and a little salt until they are very soft. The onions should be transparent, and there should be no browning of the vegetables. Then add the garlic and saffron, and cook for another 30 seconds until the garlic is fragrant. Then add the chorizo and cook for another 5 minutes to develop the flavors.

2. While the sofrito is cooking, bring a large pot of salted water to a boil and cook the pasta. Place the chopped tomatoes in a colander, and drain the pasta into it, reserving 1/2 cup or so of the cooking liquid. Toss the pasta and tomatoes in a little olive oil to prevent it from sticking.

3. Add the wine, beer and crushed red pepper to the sofrito and turn the heat to high. As soon as the liquids come to a boil, add the clams, cover the pot, and reduce the heat to a simmer. Periodically give the pan a little shake until the clams steam open. Remove the clams and set aside, discarding any that do not open.

4. Add the fresh herbs to the pan and reduce the cooking liquid slightly. Season to taste, and toss with the pasta and clams, adding some of the pasta cooking liquid if necessary.

NOTES: Use good quality olive oil. It is a big flavor component in the sofrito, and if it doesn't have good flavor, the finished product definitely won't. The same goes for the beer and wine. Use stuff that tastes good enough to drink. The clams will absorb their flavors, and when the liquids reduce during cooking, the flavors will intensify as well.

Tuesday, April 27, 2010

Carbon Steel Fry Pans, Oh Yes I Do!

De Buyer Mineral after seasoning (Front), and Paderno World Cusine before seasoning (Back).

Non-stick pans skeeve me out. Teflon and other high tech coatings may be relatively harmless, but only up to a certain temperature, at which point they start to give off toxic gases. I also haven't met a non-stick pan that doesn't scratch or peel, whatever promises they make. So then you have to replace it or risk the coating coming off on your food. Doesn't sound like a healthy relationship to me.
I ditched non-stick a long time ago in favor of seasoned steel cookware. It all started years ago at Kmart, when I bought a Martha Stewart 10" cast iron fryer. Inexpensive and reliable, it now has a sexy black sheen from years of Sunday morning bacon and eggs. Since then, I have gradually accumulated a dutch oven, a 12" fry pan, a grill pan, and a flat skillet too. When it comes to cast iron, I now buy Lodge Logic because their pans come already seasoned. The downside to cast iron is the weight, and there is no way to make a proper omelet in a cast iron pan. It takes two hands for me to lift the 12" fry pan even when it's empty, and I could probably use it to take out a 250 lb. intruder with a single blow to the head. Cast iron is also brittle, and can break from the impact if dropped, or crack if heated too quickly over high heat.
So recently, I decided to look into getting myself some traditional European style carbon steel fry pans. They're much lighter than cast iron, but still heavier than aluminum or copper core stainless pans. There are a bunch of carbon steel pans out there - some referred to as Black Steel, some as Carbon Steel, and even Blue Steel. But they are all raw steel that must be seasoned before use. Seasoning refers to the process of sealing a steel pan with oil, which protects it from rust and provides a natural non-stick coating that only gets better with use. The process for all raw steel pans, including cast iron, is pretty standard. Basically you want to make sure the pan is clean of any residue from the manufacturing or packaging process. Then you just coat the pan with a flavorless oil and heat the pan. Then once the pan is cool, wipe out the excess oil. If the coating ever gets messed up, you can just scrub the pan clean and start all over.
After browsing around and reading some reviews, I settled on buying a set of three De Buyer Mineral fry pans. Released in 2010, the De Buyer Mineral series are 99% iron, made from recycled material, and can be used with the widest range of heat sources, including induction cook tops. The set includes 8",10", and 12" Lyon shaped fry pans, with deep angled sides. The seasoning instructions included with the De Buyer pans were a little more involved. Before you season the pan, they instruct you to boil some potato peelings in the pan for 15 minutes, dispose of the peelings, then rinse and wipe the pan dry. It appears that the starch in the potatoes binds to any grime embedded in the metal that is released as the pan is heated, resulting in a more thorough cleaning. Next De Buyer instructs you to heat about 1/2 cm of oil in the bottom of the pan instead of just coating the pan with oil. The rest of the process is the same.
Anyone skeptical of the recycled Mineral pans can put their reservations to rest. I am in love with these pans! They performed beautifully right after the initial seasoning. I cooked myself an over easy egg in the 8" pan with just a little butter and the pan was so slick the egg slid around and flipped effortlessly. French Toast and Pork Chops browned up nicely and didn't stick to the 10" or 12" pans.
For sake of comparison I also ordered a less expensive Paderno 8" heavy duty carbon steel pan ($26.90 at Amazon). At first glance there are obvious differences between the pans. The De Buyer pans have a smoother factory finish, a higher offest handle, and more eye-appeal. The Paderno pan is much more basic. It is heavier and shaped more like a standard saute pan, with shallower sides and a straigher handle than it's De Buyer counterpart. Performance wise though, they are the same. Eggs slid around just as easily in the Paderno pan, and the crusty residue left by the beans for my Huevos Rancheros wiped clean with a paper towel.
So from a cost standpoint, the Paderno pan was a more ecomonical choice, but I do like the fact that the Mineral pans are made from recycled material. Regardless, I expect to have a long and happy relationship with these pans. Both of them are great, and with proper care and maintenance I'm sure they'll last long enough to be passed down to my grandchildren, or be sent off to the thrift store to find a new life once I'm long gone.
Notes about Carbon Steel/ Raw Steel cookware:
Great for pan roasting and saute-ing, and cooking foods that tend to stick to other pans. Stir fries or dishes that use plenty of oil or fat are the perfect use for these pans. Your food will get a nice sear and the fat will maintain the pan's seasoning.
Care is the same as cast iron. To clean, just rinse in really hot tap water and wipe out any residue with a dry towel. If by some chance there is some food stuck to the pan, you can make a paste of coarse salt and a little water, and use a dry sponge or towel to scrub out the offending matter. I find filling the pan with really hot water and scrubbing with a natural bristle brush (like a vegetable cleaning brush) works better than the salt paste and doesn't damage the seasoning. Before storing, dry the pan thoroughly, and use a paper towel or clean dish towel to thinly coat it with vegetable oil.
Cooking highly acidic foods can strip away the seasoning on your pan. So keep the vinegar away - save your stainless cookware for that.

Thursday, April 8, 2010

Char Siu & Chinese Broccoli with Budding Chives

Char Siu (Chinese Style BBQ Roast Pork)
I have a confession to make. Despite my Asian heritage, I don't know much about cooking Asian food. Sure, I know how to stir-fry and know how to use the more common Asian ingredients, but Mom's home cooking was nothing like restaurant food. After years of cooking for myself, then going to culinary school, I can make Bechamel sauce for mac and cheese, French Onion Soup, and Chipotle and Chorizo Chili without blinking an eye, but ask me how to make Chinese standards like Red Cooked Pork, Sweet & Sour Sauce, or Kung Pao Chicken, and I wouldn't know where to start.
So last weekend when Chef and I were batting around ideas for a special using Black Sea Bass, and he said "Why don't we go Asian?" I felt my heart sink. Um, anytime my family went out for say, Chinese, we ate family style and had giant fish steamed whole, head on and everything, with a simple garnish of ginger and garlic. The waiter would cut the fish open and remove it's spine and ribs tableside. Then my mind went to all the restaurants in Chinatown with succulent roasted meats hanging in their windows, beckoning hungry patrons from the street. I thought of my favorite Thai joint in Astoria, and the hot stone bowl casseroles and seafood pancakes at my favorite Korean restaurant. Still, I didn't know how to cook any of these dishes, much less how to adapt them to western style fine dining.

Stir Fried Chinese Broccoli and Budding Chives
I took this as motivation to get back in the kitchen - my home kitchen - and further educate myself on how to use new ingredients and new methods. I thought I would start with one of my favorite comfort food items, and a Chinese staple: Char Siu, or Chinese roast pork. It always reminds me of working summers at my Dad's office in Chinatown, where I would regularly have a simple lunch of Char Siu with white rice and fresh stir-fried greens. So I decided to consult the country's leading authority: Martin Yan. I copied down the ingredients from my autographed copy of Martin Yan's China and drove down to my local Asian grocery. The budding chives and Chinese broccoli looked really fresh, so I picked up some of those too and stir fried them with some fresh garlic and chili sambal. I know that Siracha Sauce is all the rage right now, but I prefer Chili Sambal as a spicy condiment.


By the way, a thousand pardons for the recipe drought. I've been cooking a lot, just not at home, and nothing I can share. I finally got some time this week to cook for Boyfriend and myself. This recipe for Char Siu is for oven roasting, but I'll bet grilling over hardwood charcoal would be smoky and delicious too! Enjoy.


Char Siu (Chinese BBQ Roast Pork)


Notes: Mr. Yan's recipe was just like my memories of Chinatown, except for a couple things. First, it called for sugar in the marinade, which I found unnecessary. Also, after cooking, his instructions were to simply bring the marinade to a boil and brush over the pork before serving. I found the resulting sauce was too sweet and thick for my taste. After bringing it to a boil, I diluted the marinade with some hot water and that seemed to do the trick.

INGREDIENTS, serves 4
(3) 1/2 lb.well marbled shoulder steaks or 1-1/2 lbs. pork butt
1/4 c. soy sauce
1/4 c. honey
1/4 c. hoisin sauce
3 Tbsp. rice wine or dry sherry
2 tsp. minced garlic
2 tsp. minced ginger
1 tsp. sesame oil
1 tsp. ground white pepper
1 tsp. Chinese 5-spice powder

PROCEDURE:
1. If you are using pork butt, slice the meat into three pieces of equal thickness.

2. To make the marinade, mix the rest of the ingredients in a large bowl. Add the meat, cover and let marinate in the refrigerator for 4 to 24 hours. (I only had time for 4 hours, but if you marinate longer, you'll get more flavor, and an attractive red ring around the meat when it's sliced).

3. To cook, preheat oven to 400°F. Place a rack over a baking dish (you may want to line it with foil for easy cleanup). Pour about 1/4" of water in the baking dish. Arrange the meat slices in a single layer on the rack and roast, basting with the marinade every 15 minutes until they are cooked through. (For 1" thick shoulder steaks, it took about 45 minutes). Let the meat rest for about 15 minutes then slice it against the grain.

4. Combine the marinade with any pan drippings in a small saucepan and bring it all to a boil over high heat. Dilute with hot water if you want a thinner, less sweet sauce, or simmer and reduce if you want a thicker sweeter sauce. Brush over the pork and serve.

Stir Fried Chinese Broccoli with Budding Chives

Notes: Chinese broccoli can be braised whole, but the stalks stay very crunchy long after the leaves are wilted. By separating the leaves and floret from the stalk, then slicing the stalk into smaller pieces, everything will cook more evenly and be less work to eat.

INGREDIENTS, serves 4:
one bunch (about 12 stalks) of Chinese Broccoli
one bunch (about 1/4 lb.) Budding Chives
1-1/2 to 2 tsp. minced garlic
3 Tbsp. vegetable oil
salt
1 tsp. Chili Sambal (adjust to taste)

PROCEDURE:
1. Wash the Chinese Broccoli thoroughly in a large container of water. Separate the large outer leaves from stalk and trim the florets to 2" long pieces. Thinly slice the thick part of the stalk. Cut the Budding Chives into 2" long pieces.

2. Combine oil and garlic. Heat wok over high heat. Pour oil garlic mixture into the wok and swirl around a few seconds. Add all the Chinese broccoli and Budding Chives to the wok. Saute for about 5 minutes over high heat, stirring continuously, and adding oil as needed to lightly coat the vegetables.

3. Add enough water so that after any steam clears, there is about 1/4" of water at the bottom of the wok. Simmer over high heat until most of the water has evaporated and the broccoli is cooked but still bright green. Season with salt and Chili Sambal to taste.
AMAZON